How do i replace a golf cart drive belt

How to Replace a Golf Cart Drive Belt: Costs, Time, Tools & Step-by-Step Guide

A fresh drive belt restores acceleration, hill performance, and consistent cruising. This guide explains how to diagnose a worn belt, what you’ll spend, how long it takes, the tools you need, and the correct path for the new belt across the clutches so your cart feels crisp again.

How to tell if a drive belt needs replacing?

  • Slipping or sluggish takeoff: Engine revs rise but ground speed lags, especially uphill.
  • Glazing or cracks: Shiny, hardened sidewalls, fraying cords, splits, or missing chunks.
  • Width below spec: A belt that’s narrowed from wear rides lower in the pulleys and loses ratio range.
  • Chatter or squeal: Noise on takeoff can mean glazing, contamination (oil/grease), or alignment issues.
  • Flat spots or glazing on clutch faces: Often appears with a slipping belt—inspect both sheaves.

How much does it cost to replace a drive belt?

Item Typical range (USD) Notes
Replacement belt $25–$90 OEM or high-quality aftermarket matched to model/year
Labor (shop) $60–$150 ~0.5–1.0 hour depending on access and inspection
DIY total $25–$90 Assumes basic tools on hand

How long does it take to change a drive belt?

Plan 20–60 minutes for most models. First-timers may take up to 60–90 minutes if you add cleaning and a full clutch inspection.

What tools do I need to replace a golf cart drive belt?

  • Basic socket/ratchet set and combination wrenches
  • Torque wrench (for any bolts you remove/reinstall)
  • Flat plastic pry tool or belt tool (model-specific)
  • Screwdrivers (to remove guards/covers)
  • Shop towels and non-residue cleaner (for sheaves)
  • Wheel chocks
  • Work gloves and eye protection
  • Service manual or parts diagram for your model
  • Light source to see belt path and alignment marks

Step-by-step: Replace the drive belt

  1. Prepare safely: Park on level ground, set the brake, chock wheels, and turn the key off. Disconnect battery negative to prevent accidental starts.
  2. Access the belt: Remove the seat/rear cover and any belt guards to expose the primary (engine) and secondary (transaxle) clutches.
  3. Inspect and clean: Wipe dust and belt residue from sheave faces. If you see oil/grease contamination, address the leak before installation.
  4. Remove the old belt: On many models you can roll the belt off the secondary by rotating the clutch by hand while easing the belt outward. Use only plastic tools—avoid damaging sheave edges.
  5. Check clutch movement: Verify that movable sheaves slide freely. Binding, grooves, or hotspots may require professional service.
  6. Orient the new belt: If arrows are printed, they must point in the forward rotation direction. If text is present without arrows, install so the text reads left-to-right when viewed from the side (common practice).
  7. Thread the belt (general path): Loop around the primary clutch first, then around the secondary. Start the belt deep in the secondary sheave and rotate the secondary while guiding the belt into place. Ensure it sits evenly, not pinched.
  8. Verify alignment: The belt should ride squarely in both clutches. Refit guards/covers per the manual and torque fasteners to spec.
  9. Function check: Reconnect the battery. With the rear wheels off the ground (if safe) or on level ground with a helper, start and gently blip the throttle—watch for smooth engagement without chatter.
  10. Road test: Perform a light drive, then a short hill. Listen for squeal, inspect belt tracking, and recheck cover fasteners.

What is the correct way to thread the new belt through the pulleys?

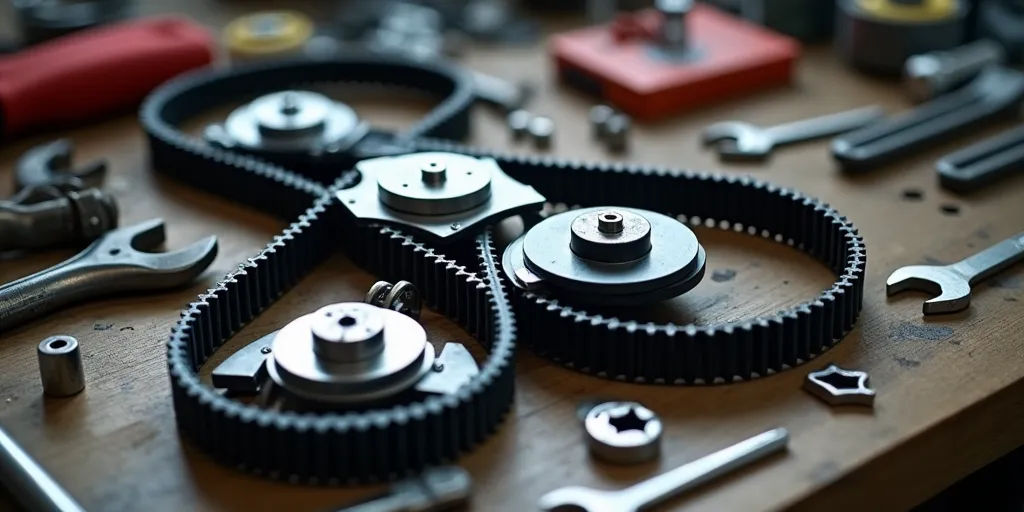
The belt must follow the exact OEM path: primary (engine) clutch → secondary (transaxle) clutch. Keep the belt centered in both sheaves and observe these points:

  • Direction matters: Follow arrows on the belt; if none, keep any printed text readable from the side you’re installing. This helps the belt’s manufacturing set wear in one direction.
  • No twisting: A twist or partial cross will cause noise, heat, and rapid wear.
  • Seat the belt fully: Rotate the secondary by hand to let the belt walk into its natural position before starting the engine.
  • Clearances: Ensure the belt doesn’t rub guards or wiring. Adjust or reseat covers as needed.
Break-in tip: For the first 10–15 minutes, use gentle throttle and avoid sustained full-load climbs. This lets the belt mate to the sheave faces evenly.

After-install checks & troubleshooting

  • Squeal on takeoff: Clean sheaves again; verify belt direction and that no oil/grease is present.
  • Harsh engagement: Check idle speed and throttle cable adjustment; ensure the secondary isn’t binding.
  • Low top pace after new belt: Confirm belt width matches spec and is not routed incorrectly; inspect for draggy brakes or underinflated tires.
Safety first: Never reach into rotating clutches. If you must run the engine for diagnostics, keep guards on and hands clear. When in doubt, consult a qualified technician.

Leave a Reply

tara golf cars, tara electric golf cars, tara golf fleet, best golf car, fleet cars, 2025, club car, ezgo, yamaha, alternatives, golf courses, golf club,
[newsletter_form]