A properly tightened drive belt keeps your golf cart running smoothly, prevents slippage, and improves performance. Regular inspection and adjustment ensure reliability, efficiency, and longevity of your cart. If you’re maintaining your vehicle, pairing it with dependable golf carts makes your time on the course even more enjoyable.
The drive belt is a crucial component that transfers power from the motor or starter generator to the transaxle. Over time, belts can loosen or wear, which reduces efficiency and can cause damage to other parts. Ensuring the belt is properly tensioned avoids slipping, improves acceleration, and extends the belt’s lifespan.
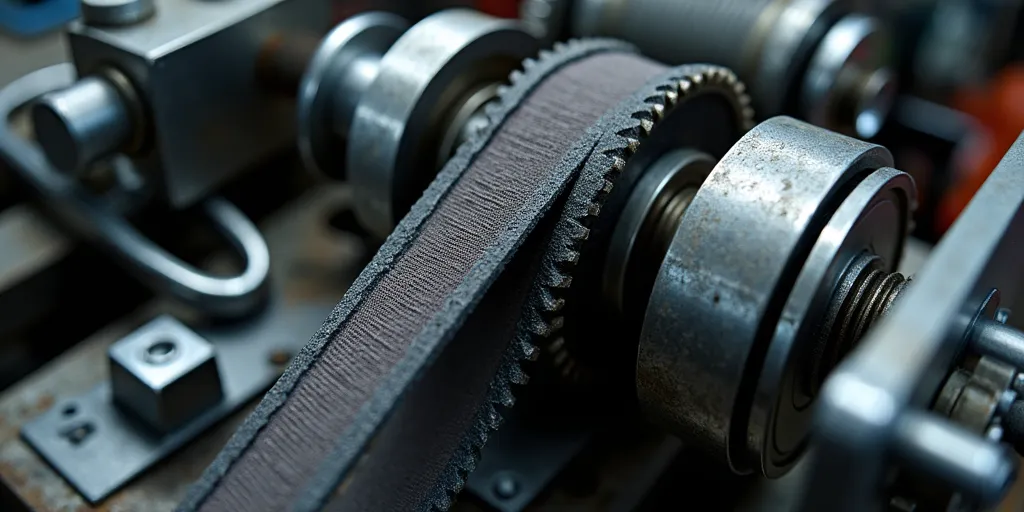
Open the engine compartment to find the drive belt, which runs between the motor or starter generator and the transaxle. Visually inspect the belt for signs of wear, such as cracks or fraying.
Using the correct wrenches, loosen the bolts that secure the motor or starter. Do not remove the bolts entirely—just enough so the motor can shift when pressure is applied.
Place a pry bar or wooden lever between the motor and its mount. Gently push the motor away from the transaxle to increase belt tension. Apply steady, even pressure to avoid stressing the parts.
Once the proper belt tension is reached, re-tighten the motor or starter mounting bolts securely. Make sure everything is firmly in place to hold the motor at the new position.
Press on the center of the belt with moderate pressure. It should move about half an inch. More movement means it’s too loose, while less movement suggests it may be too tight.
After tensioning, check the belt one more time for damage. If it shows cracks, fraying, or excessive wear, replace it immediately. Tightening alone will not fix a worn-out belt.
If you notice any of these symptoms, it’s time to inspect and adjust your golf cart’s drive belt before the issue worsens.
Regular maintenance prevents costly repairs. Clean the engine compartment regularly to keep dirt and debris away from the belt, avoid overloading the cart, and schedule belt inspections every few months. Replace the belt according to the manufacturer’s guidelines or sooner if you notice excessive wear.
Maintaining the drive belt is vital, but so is using a quality cart. Modern golf carts are designed for durability, comfort, and consistent performance. They not only improve your playing experience but also reduce maintenance issues, letting you focus more on the game and less on repairs.
Tightening the drive belt on a golf cart is a straightforward task with the right tools and careful adjustments. By loosening the bolts, applying tension with a pry bar, and securing the motor, you can restore your cart’s performance quickly. Regular inspections and timely replacements will keep your cart reliable. When paired with high-quality golf carts, proper maintenance ensures every round on the course is smooth, efficient, and enjoyable.
