Tight on headroom? A roof-lowering kit helps a golf cart duck into garages, sheds, and toy haulers—no cutting, no removal—while keeping full height for everyday driving.
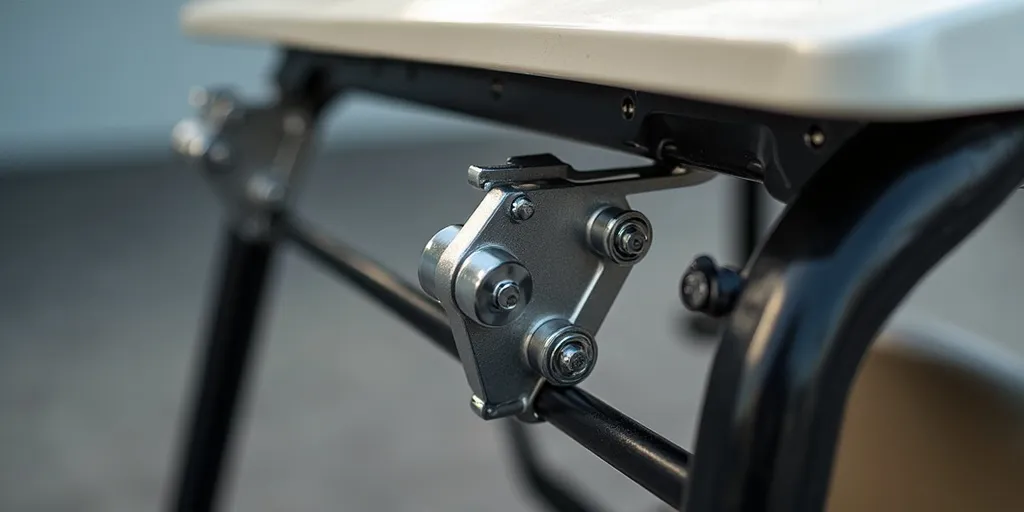
A roof lowering kit uses a hinged bracket system on the roof struts so you can temporarily drop the canopy several inches for storage or transport, then return it to normal height in seconds. Unlike permanent modifications, these kits retain factory geometry and weather protection. Most include model-specific brackets, grade-rated hardware, safety pins, and clear instructions; many are designed for struts measuring 1" or 1.25" square/round, making them adaptable to a wide range of carts.
The system replaces (or supplements) your existing roof strut mounts with pivoting hinges. Pull a locking pin or quick-release knob, ease the roof down toward the seat back or cowl, and secure it with a secondary latch. When you’re ready to raise it, reverse the steps—no tools required after the initial install. Because the canopy stays attached, you preserve rain and sun protection as soon as you pop it back up.
Start by measuring three things: (1) your doorway or trailer opening, (2) the roof’s highest point in normal position, and (3) the roof height with the kit in the lowered position (from the kit specs). The difference tells you whether you’ll clear your target opening with margin. Also note accessories attached to the canopy—light bars, speakers, or storage trays—which may become the tallest points and reduce the benefit if not repositioned.
Lower the roof slowly and evenly, keeping hands clear of pinch points. Don’t drive with the roof in the lowered position. Periodically inspect hinge bolts, bushings, and pins; apply a dab of anti-seize or light lubricant if the pivots squeak. If you wash the cart frequently, re-check torque after a few cycles as plastics and metal brackets can settle.
A lift kit increases ground clearance and allows larger-diameter tires, improving breakover on rutted paths, campsite entries, or uneven neighborhoods. It can also raise seating for a more upright view, and—paired with tire changes—tweak gearing for better obstacle roll-over. For users who frequently traverse curbs, gravel, or mild trails, a lift can reduce underbody scrapes and improve comfort.
If your sole goal is storage clearance, a roof lowering kit is simpler and avoids those compromises—raise it for normal driving, drop it only when you need space.
Taking the canopy off each time seems easy, but it risks cracked plastics, lost hardware, and time-consuming alignment. A hinge kit eliminates repeated disassembly and protects weather sealing. For fleets, the time savings add up quickly: attendants can lower rooflines for overnight storage and return them to full height before opening.
A roof lowering kit is a practical, reversible way to make your golf cart fit where space is scarce—garages, sheds, and toy haulers—while keeping everyday comfort and protection. Measure carefully, pick a kit matched to your struts, and follow the install torque specs. You’ll gain flexible storage without the hassles of permanent modification or repeated canopy removal.
